




The years between six and eleven are a strange, beautiful gap. Your kid is out of the toddler tantrum phase but hasn’t hit the hormonal storm of adolescence yet. Psychologists call this the latency period. It’s a time for pure, unfiltered discovery. You can shape that discovery by looking at how you design their bedroom.
Grade-schoolers are a contradiction. They still need floor space to sprawl out and play. They also need to get homework done. A sturdy desk and a chair that doesn’t hurt your back are non-negotiable. Keep breakable stuff off the shelves.
Involve them in the planning. If they help pick the colors, they’re more likely to keep the room tidy. They are forming their identities now. Lean into their hobbies.
Start small with key items. A single bold piece can anchor the whole vibe. One boy hated his turquoise walls until he got a quilt with a white tiger. The quilt had turquoise, brown, and green borders. Suddenly, the room felt like a jungle. It worked.
An artistic girl couldn’t pick a color theme. She ended up with a rainbow motif just because people kept gifting her rainbow accessories. It worked quickly. The bonus is that almost any solid color fits in.
You might still argue over paint. Let them have vivid blue and bright orange on small furniture. Paint the walls a pale, light version of that color. It expands the space.
Don’t try to make it look like a magazine cover. Those photos are staged. Real life is messy. Toys, books, and clothes will take over anyway. Keep it simple.
Stick to a simple palette. Two or three hues keep the room from feeling chaotic. When you buy or refurbish furniture, keep these colors in mind. If the pieces are beat-up, paint them one color. Add wood pulls and knobs in a second shade. It costs pennies but changes everything.
For fabric, use the sedate color for big items. Think comforters. Think an upholstered computer chair. Save the brighter, lighter colors for pillows. Small accents are easy to swap. Say your child likes navy and yellow. Later, they might prefer pink or light green. You can change those pillows without buying a new bedspread. It’s cheap flexibility.
When Themes Clash
What if their favorite colors and their chosen theme don’t match? This happens. Kids have imaginations that run wild. Don’t fall back on prepackaged ideas. They are often too soft. Too sweet.
Take a butterfly theme. Most people think delicate pastels. But a monarch butterfly is dramatic. Black and orange. Bold. High contrast. Imagine peach walls. Hang prints of monarchs on them. Use black lacquer furniture. Add brass butterfly drawer pulls. It’s not cutesy. It’s cool.
Virtually any concept works if you stop looking at the gift shop displays and start looking at the real thing. Use creativity.
Ask the Kid
Stumped on how to make it work? Just ask.
To a grade-schooler, imagination is clear. It’s not filtered through trends. A sea green giraffe might be exactly what they want. Let them tell you. You don’t need to design the room alone. Their input prevents regret later.
There are plenty of other directions to take. Each one serves a different purpose.
- Garden District : Old-world charm. Built-in elegance.
- On the Frontier : The Old West. Popular for both boys and girls right now. Requires specific execution.
- Components of Fun : Heavy storage. It looks good and actually works.
- Room to Grow : Simple design. Girlish touches.
- That Sporting Life : Classic sports theme. Comes in all colors and styles.
- Old World Enchantment : Subtle color. Accessories that last.
- Outlook: Cool and Sunny : Bright hues. Warm wood tones. They coexist.
- Crayon Box Colors : A simple paint change. Inexpensive spruce-up.
- Garden Flair : Soothing colors. Furniture that supports development.
- Lure of the Sea : Oceanfront theme. Stretches the imagination.
The next design moves away from the abstract. It grounds the room in something tangible. Formal. Structured.
Garden District Kids’ Bedroom Decorating Idea
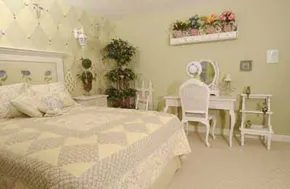
This approach gives a child’s bedroom the look and feel of a formal garden.
Grounded Greens and Graphic Walls
Forget the standard pastel palette. Most girl’s rooms default to ice cream tints, but that approach often feels dated fast. The real secret to a lasting garden style? Subtle sage and celery greens. They are versatile enough to pair with periwinkle or mauve without looking like a nursery rhyme. This grounded color scheme appeals to sophisticated tastes, keeping the space chic rather than saccharine.
The visual weight comes from the hand-painted images. Walls, trim, and the headboard all feature them. It is a deliberate choice. Whimsy can easily tip into childishness. These designs walk a fine line. They are playful but not overly sweet. This balance is key for longevity. A design that is too specific or cute becomes a liability as the child grows.
DIY Considerations for Painted Details
If you are tackling this look, the hand-painted elements are the primary investment of time and skill. You need a steady hand and the right brushes for fine details. Consider the wall preparation carefully. Smooth surfaces take paint best for intricate work. Sanding and priming are non-negotiable steps before you start painting images on trim or headboards.
Choosing a Style That Ages Well
Why does this specific color combination work? It avoids the high-contrast look that screams “toddler.” Sage and celery are muted. They allow bolder accents like mauve to pop without overwhelming the senses. The hand-painted motifs add character without relying on licensed characters or trends that fade in a year.
Where do you find such designs? Custom stencils or freehand painting are options. For the DIYer, starting with the headboard is a manageable project. It isolates the mess and allows for precision. The walls can follow, using simpler patterns if you are not confident in your brushwork.
Material and Tool Notes
You will need high-quality latex paint for the base coats. The greens should be matte or eggshell to reduce glare and hide imperfections in the hand-painted details. Acrylics can work for the decorative elements if you want quicker drying times between layers. Masking tape is essential for clean lines on the trim.
Does this approach require a professional touch? Not entirely. But it does require patience. Rushing the painting leads to smudges and messy edges. Take your time. The result is a room that feels curated rather than bought. It grows with the occupant. The colors do not scream. The art does not date.
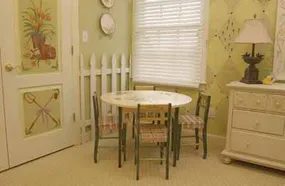
Pale furniture with hand-painted garden details pops against darker backgrounds. It is a simple trick. You add white picket fencing pieces. They act as whimsical accents. The result is a space that feels timeless.
Now we shift direction. We move west. The next concept leans into frontier themes. This approach works well for a frontier kids’ bedroom. It mixes rugged textures with playful elements.
How to Create a Frontier Theme
Start with the basics. You need raw materials. Wood is essential. Look for reclaimed pieces or distressed finishes. Paint them in earth tones. Think browns, tans, and muted greens.
Add authentic props. A small wagon wheel makes a great headboard. Or use it as wall art. Burlap curtains soften the hard edges. They also filter light effectively.
Safety matters here. Frontier decor can look sharp. Secure any heavy items to the wall. Use brackets. Check for splinters on wood surfaces. Sand them down before installation.
Why Choose This Style?
It tells a story. Kids love narratives. A frontier theme invites imagination. They can pretend they are explorers. The style grows with them. It is less childish than cartoon motifs.
For more decorating ideas, see:
-
Kids’ Rooms
-
Baby Nursery Decorating Ideas
-
Toddlers’ Bedroom Decorating Ideas
-
Teen Bedroom Decorating Ideas
-
Playroom Decorating Ideas
-
Kids’ Bathroom Decorating Ideas
-
Safety Tips for Decorating Kids’ Rooms
-
Kids’ Rooms Decor
On the Frontier Kids’ Bedroom Decorating Idea
This look is not for everyone. It requires effort. But the payoff is unique. You avoid the cookie-cutter look. Your child gets a room that feels personal.
Use natural fibers. Cotton rugs. Wool blankets. These materials feel authentic. They also add warmth. Contrast them with metal accents. Brass or iron hardware works well.
Paint techniques matter. Try distressing your paint job. Sand the edges. Let the wood show through. This gives an aged appearance. It looks intentional, not worn out.
“The key is balancing ruggedness with comfort. You want a space that feels adventurous but safe.”
Keep the color palette limited. Stick to three main colors. This prevents visual clutter. It makes the room feel larger.
Add soft lighting. A lantern-style lamp adds atmosphere. Avoid harsh overhead lights. They kill the mood. Use bulbs with warm tones.
Consider the layout. Leave open floor space. Kids need to play. Furniture should not crowd the room. Float the bed away from walls if possible. This creates flow.
“Don’t forget storage. Frontier style often features wooden crates or chests. They are practical and thematic.”
These containers hold toys. They also serve as decor. Label them clearly. Make them easy for small hands to open.
The goal is a lived-in feel. It should not look like a museum display. It needs to function. A frontier bedroom is a bedroom first. It is a place to sleep. It is also a place to dream.
What happens when the child outgrows the theme? The rustic elements often transition well to teen decor. Keep the wood. Change the textiles. Swap the white picket fence for a simple metal frame. The bones remain solid.
This style relies on texture. Layer it. Pile it
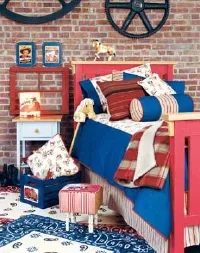
Cowboy boots may have always appealed to boys, but the American Girl doll phenomenon brought frontier lore to girls, too. Today, both genders can inhabit rustic, easy-to-live-with frontier style spaces. If you collect Americana or just love the look, bringing this vibe into a child’s room is straightforward.
Many Shaker- and Early American-style furnishings work perfectly for kids. Why? Because they are simple and practical. Take wall racks with pegs. These were frontier fixtures, and they are far easier for children to manage than hangers in a closet.
Contoured wood chairs are sturdy. They hold up to daily use. Quilts are colorful and washable. Frontier-style heirlooms are already weathered and faded. You don’t need to distress them yourself. If you are stuck on a color scheme, all-American red, white, and blue is a natural fit.
Practicality is a hallmark of modern design as well.
How to Make a DIY Lamp from Household Items
Virtually any object can become a lamp. The easiest method involves buying a lamp kit. You can find these at hardware or home supply stores. The kit includes electrical wiring, foundation supports, and a harp for holding the lamp shade.
Start by finding a base that matches your decor. Clay pots work. Glass hurricane shades filled with buttons or shells work too. Tightly woven baskets are good. Pottery and wooden items all function well as bases.
If the item is not hollow, drill a hole. Make it wide enough for the electrical wiring to thread through. Assemble the lamp parts according to the kit instructions. Begin at the base and work your way up to the socket. Top it with a coordinating shade.
You now have an instant conversation piece.
Praticality is a hallmark of modern design, too, as demonstrated in the decorating idea on the next page.
Why Shaker Furniture Fits Kids’ Rooms
Shaker design is not just about religion or history. It is about function. Kids break things. They spill things. They need storage that does not require fine motor skills to operate.
Peg racks replace hangers. Hangers jam. Pegs do not. A child can hang a coat in two seconds. They can take it down in two seconds. This reduces frustration. It also keeps the room tidy without adult intervention.
Safety and Materials to Consider
When building or buying frontier-style decor for children, material choice matters.
- Wood: Look for solid wood. It is durable. It can be sanded and refinished if scratched.
- Fabrics: Choose washable quilts. Cotton blends are best. They withstand frequent laundering.
- Electrical Safety: If you make your own lamps, ensure all wiring is concealed. Use cord covers if necessary. Keep plugs out of reach.
- Stability: Ensure tall furniture is anchored. Frontier-style armoires can be heavy. Tip-over hazards are real.
Where to Find Authentic Pieces
You do not need to carve every piece yourself. Many antique stores carry Shaker-inspired furniture. Look for simple lines. Avoid ornate carvings. The value is in the cleanliness of the form.
For newer items, check stores that specialize in country or farmhouse decor. These pieces often mimic the Sh
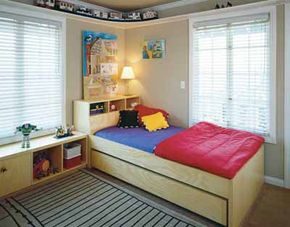
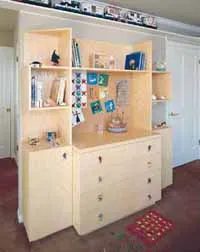
Modern style isn’t just about aesthetics. It’s about function. A room for a young boy needs to work harder than it looks. You want a space that is fun and flexible. But you also need to avoid the chaos that usually follows a child’s imagination.
This design works because it doesn’t force a single theme. Most kids outgrow one obsession fast. One week it’s superheroes. The next, it’s dinosaurs. Or trains. Forcing a strict theme creates clutter. It creates waste. This room lets the occupant keep their favorite treasures out in the open.
Storage is the real hero
The secret to keeping things from looking messy is storage. Lots of it. Open storage is the smart play here. It is attractive, sure. But primarily, it is accessible. When you can see your toys, you can put them away.
The furniture in this example is smooth Finnish birch plywood. That looks great. But the material doesn’t matter. You can use unpeeled cedar logs. You can use cheap laminate. The key is the principle. Provide what is needed for sleep. Provide a place to study. Create space for storage. Allow for self-expression. And leave room for play.
“The key is the focus on providing kids with just what they need… and good old-fashioned play.”
Adapting the design to your needs
You don’t need birch plywood to make this work. You need a system that grows with the child. Start with low shelving. It keeps things within reach. It keeps things off the floor. Floor space is for playing. Shelves are for keeping order.
Think about how you apply this to other materials. Rough wood adds texture. Smooth laminate is easy to wipe down. The finish is secondary. The structure is primary.
Why this approach wins
Clutter is the enemy of a good night’s sleep. It’s also the enemy of focus. By using open storage, you turn organization into a habit. The child sees the space. They maintain the space. It becomes less of a chore.
Girls might prefer a delicate, romantic look. That’s fine. The principle remains the same. Identify what the child loves. Create a dedicated, accessible place for it. Leave the rest of the room open for breathing room.
Practical next steps
If you are tackling this yourself, start with the big items. Bed. Desk. Main storage unit. Keep lines clean. Add color through textiles. Add personality through the toys themselves. Don’t paint the walls with a theme. Let the room be a canvas.
Safety tips for decorating kids’ rooms always start with anchoring furniture. Tip-proof cabinets. Soft edges on tables. These basics matter more than the style. Once the room is safe, make it personal.
See more kids’ rooms and nursery ideas online. Look at toddler bedrooms too. The principles transfer. Playroom decorating ideas often use the same open-shelf logic. It works everywhere.
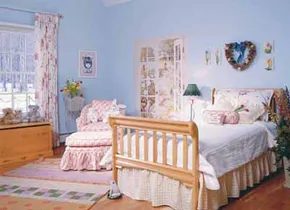
A room with just a desk and a dresser feels empty. It begs for color. For personality. For a place where a young girl can actually relax.
The homeowner started with what was there. Practical furniture. No frills. Then they pivoted. They wanted a breezy garden escape. Something light. Something that didn’t feel cramped.
Small rooms are tricky. You can clutter them fast. Or you can stretch them out with the right tricks. This room did both.
The Power of Sky Blue Walls
Sky blue walls changed the air in the room. It wasn’t just paint. It was an airy feeling. The tall window helped, letting light in. But the blue did the heavy lifting. It mimics the sky. It pushes the walls back visually.
Then came the mural. A trompe l’oeil garden scene. It looks like a window into a lush yard. It expands the space. It tricks the eye.
Here’s the best part. It wasn’t hand-painted. It wasn’t expensive custom art. It was wallpaper. You can get this look without hiring an artist. Just pick a mural that fits the vibe.
The mural isn’t an expensive hand-painted one; it’s actually wallpaper.
Diagonal Rugs for Instant Width
Flooring matters. Most people lay rugs straight. Parallel to the walls. This room broke that rule.
The rug went on a diagonal.
That angle cuts the boxiness. It draws the eye across the room. It makes the floor feel wider. It’s a simple shift. But the impact is immediate. The result? A cool, comfortable space. One that doesn’t feel like a closet.
This isn’t magic. It’s design math. Blue recedes. Diagonals expand. Mural adds depth.
If sports are more your kid’s thing, skip the flowers. Look at the next idea. But for now, try painting a wall sky blue. Hang a mural. Lay a rug at an angle. See what happens.
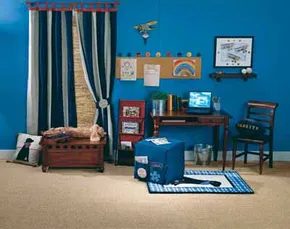
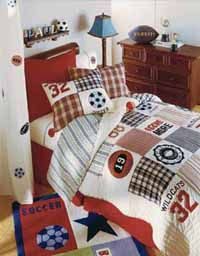
If your kid lives for game days, a sports-themed bedroom is a safe bet. It works for boys, obviously. But girls’ rooms have changed too. You don’t just see pink and purple anymore. Now there are athletic ensembles in soft aqua and lilac. Gray, blue, tan, and red remain staples.
Pick colors from a pro or college team you actually follow. It creates instant connection. The best part? Sports fandom rarely fades. Most hobbies shift as kids grow. This one sticks. You won’t need to redo the room every few years. The neutrals and primary hues keep it timeless. It’s versatile.
A love of sports may last a lifetime, making it a smart decorating investment.
This approach wins because it ages well. You’re not painting over trends every two years. You’re building on passion.
If that’s too loud, look to nature. The next section covers garden-inspired decor. It’s quieter. More subtle.
For more ideas, check out:
- Kids’ Rooms
- Baby Nursery Decorating Ideas
- Toddlers’ Bedroom Decorating Ideas
- Teen Bedroom Decorating Ideas
- Playroom Decorating Ideas
- Kids’ Bathroom Decorating Ideas
- Safety Tips for Decorating Kids’ Rooms
- Kids’ Rooms Decor
Old World Enchantment Kids’ Bedroom Decorating Idea
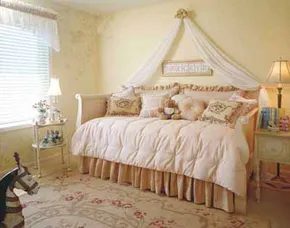
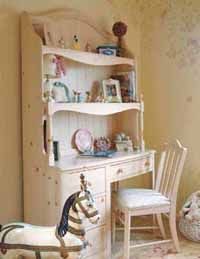
The girl in question likes bright pink and yellow. Her mother didn’t want a room that felt like a candy wrapper. Too loud. Too overwhelming. She worried her daughter would tire of the intensity within a month.
The fix was subtle. Not neon. Not harsh.
They went with romantic, muted versions of the girl’s favorites. Porcelain pink. Mauve. Antique ivory. Old gold. Colors that feel soft to the touch.
Her furniture fit right in. Simple whitewashed pine. It had that French country vibe. No heavy carving. No ornate details. Just clean lines and a relaxed feel.
The bed became the centerpiece. A simple swag of fabric across the top made it look special. It wasn’t a canopy. Just a hint of fabric.
Vintage touches added soul. A faux bamboo end table. A circus rocking horse. Nostalgia matters in a kid’s room. It grounds the space.
The walls got delicate treatment. Trompe l’oeil fairies. Leaves. Vines. Painted on with a light hand. Not cartoonish. Not cluttered. Just enough to spark imagination without screaming for attention.
This room isn’t just for now. It’s built to last. She’ll cherish it through the years.
If you prefer bold colors, the next section shows how to pull them off without losing your mind.
For more decorating ideas, see:
-
Kids’ Rooms
-
Baby Nursery Decorating Ideas
-
Toddlers’ Bedroom Decorating Ideas
-
Teen Bedroom Decorating Ideas
-
Playroom Decorating Ideas
-
Kids’ Bathroom Decorating Ideas
-
Safety Tips for Decorating Kids’ Rooms
-
Kids’ Rooms Decor
Outlook: Cool and Sunny Kids’ Bedroom Decorating Idea
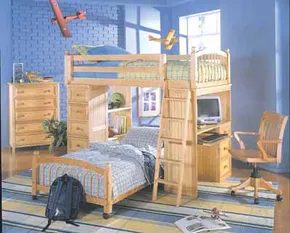
Why Blue, Green, and Yellow Work So Well in Kids’ Spaces
Blue, green, and yellow are the go-to trio for kid-friendly rooms. They pop without overwhelming the senses. The trick lies in pairing these cool, bright hues with warm natural wood tones in your furniture.
Think pieces with simple, graceful lines. Rounded corners are not just a style choice; they are a safety necessity. Hard edges are out. Soft curves are in. This combination creates a space that feels both lively and safe.
“Pieces with simple, graceful lines and comfortably rounded corners are always winners.”
When you mix analog color schemes with natural materials, the room breathes. The wood grounds the airy colors. It prevents the space from feeling too sterile or chaotic. For a DIY approach, look for unfinished wood pieces you can stain or paint to match your specific blue or green palette. Sand those edges down until they are smooth to the touch. Safety first. Style second.
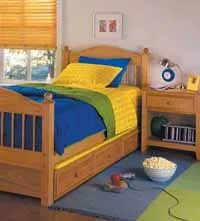
The pieces in this photo lean traditional. That’s fine. You can easily swap them for “soft contemporary” finds that hit the same warm, welcoming note. When the color palette is this inviting, solids often win out. They feel calm. Clean. But stripes, checks, and simple plaids work just as well for boys and girls alike. They add texture without screaming for attention.
Think about the long game here. Kids change. Fast. Their tastes shift from dinosaurs to drones, from pink to black, overnight. If you keep the big furniture neutral and sturdy, you aren’t locked in. You can swap out the patterns and colors with zero stress. The basic furnishings stay relevant. The room looks fresh next year without a renovation.
Changing paint colors is the cheapest way to completely alter a space. It’s the ultimate cheat code for bored parents. See the decorating idea below for how to execute this on a budget.
For more decorating ideas, see:
-
Kids’ Rooms
-
Baby Nursery Decorating Ideas
-
Toddlers’ Bedroom Decorating Ideas
-
Teen Bedroom Decorating Ideas
-
Playroom Decorating Ideas
-
Kids’ Bathroom Decorating Ideas
-
Safety Tips for Decorating Kids’ Rooms
-
Kids’ Rooms Decor
Crayon Box Colors Kids’ Bedroom Decorating Idea
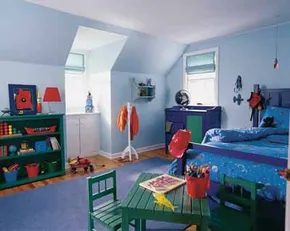
The Cost-Effective Makeover
When you want a room to look completely different but the bank account says otherwise, grab a can of paint. It is the fastest way to get the biggest bang for your buck. Your options are endless.
Why Paint Beats Renovation
You do not need to knock down walls or replace floors to change the atmosphere of a space. A fresh coat of color shifts light, alters perception of size, and updates dated styles instantly.
Consider the ROI. Painting costs a fraction of remodeling. You get a dramatic visual shift without the dust, noise, and structural headaches.
Choosing the Right Color
Do not just pick a color because it looks good in the store. Paint changes when it dries. It often looks darker and more intense on the wall than on the swatch.
Test samples. Paint a large patch on different walls. Observe it at different times of day. Morning light is cool. Evening light is warm. Your chosen hue will react differently to each.
Tools You Actually Need
You do not need a professional arsenal. Just the basics.
- A quality brush for edges and corners
- A roller with the right nap for your wall texture
- A tray
- Painter’s tape
- Drop cloths
Cheap brushes shed bristles. They leave streaks. Spend a little more on the brush. It makes a difference in the finish.
Prep Work Is Non-Negotiable
Paint sticks to clean, smooth surfaces. It does not stick to grease, dust, or peeling old paint.
- Clean the walls. Use a mild detergent.
- Fill holes. Use spackle. Sand it smooth.
- Tape off trim. Be precise.
- Prime if needed. Especially if you are going from dark to light or covering stains.
Skipping prep leads to a sloppy job. It shows. It looks cheap.
Application Technique
Cut in first. Use the brush for edges. Then roll the main sections. Maintain a wet edge. Do not let sections overlap in a way that creates ridges.
Work in small sections. Do not try to do the whole room at once. You will end up with visible seams.
“Paint is the most affordable way to transform a space, but the finish depends entirely on the prep.”
When to Call a Pro
If you have popcorn ceilings, extensive water damage, or intricate crown molding, you might want to hire someone. These tasks require specific tools and experience. For standard walls? You can do it yourself.
The result is immediate. You walk into a room that feels new. It feels like yours. The rest of the renovation can wait. Or it might not.
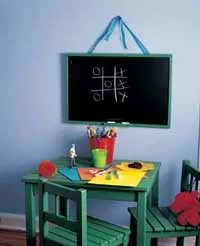
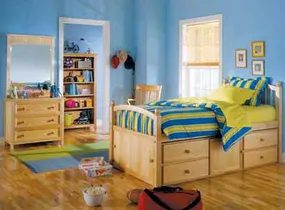
Changing wall color does heavy lifting on its own. But if you want a room that actually feels put-together without spending a fortune, match your furniture to the wall hue. It creates visual flow. In this example, pale blue walls make the space feel larger. Rich blue and green furniture blends into that backdrop. It doesn’t fight for attention. Against that cool mix, hot red and yellow accents pop. Kids love high-contrast energy.
But aesthetics aren’t everything. You also need substance. A good decor choice should support development. Here is how to build a functional chalkboard that grows with your child.
How to Build a Ribbon-Hung Chalkboard
This project turns a standard bulletin board into a writable surface. It hangs by ribbon, so there is no visible hardware cluttering the wall.
What You’ll Need
- Bulletin board
- Black chalkboard paint
- 2 small paintbrushes
- 6-inch piece of trim (same width as frame)
- Hammer and 3/4-inch brads or finishing nails
- Water-based latex paint
-
2 lengths of 15-inch grosgrain ribbon, 1 inch wide
-
Prep the board. Paint the back side of the bulletin board. Skip the frame. Use an even coat of black chalkboard paint. Let it dry completely. Repeat two more times. Three coats ensure good coverage for writing.
- Add a chalk holder. Center the trim piece on the front of the chalkboard, directly over the frame. Tack it in place using small brads or finishing nails. This little lip keeps chalk from rolling off.
- Paint the hardware. Apply two coats of latex paint to the chalk holder and the board’s frame. Let it dry between coats. This covers the original wood or metal and matches your room’s scheme.
- Attach the ribbons. Thread one end of a ribbon through the hanger on the back of the board. Tie a knot to secure it. Repeat with the second ribbon length. Bring the free ends together in front and tie them into a knot. This loop method allows you to hang the board on any wall hook or nail. Hang it where you want.
Why This Works for Child Development
A writable surface isn’t just for doodles. It encourages fine motor skills. Tracing letters and shapes builds hand-eye coordination. It also offers a dedicated space for creativity that doesn’t involve your walls.
More Ways to Style Kids’ Spaces
If this chalkboard idea sparks something, look into these related topics:
- Kids’ Rooms
- Baby Nursery Decorating Ideas
- Toddlers’ Bedroom Decorating Ideas
- Teen Bedroom Decorating Ideas
- Playroom Decorating Ideas
- Kids’ Bathroom Decorating Ideas
- Safety Tips for Decorating Kids’ Rooms
- Kids’ Rooms Decor
Garden Flair Kids’ Bedroom Decorating Idea
Another option involves bringing the outdoors in. Plants, natural textures, and earth tones can calm a restless mind. But that’s a project for another time.
Designing for Development
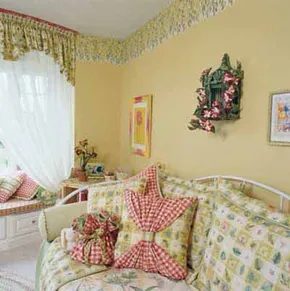
The mother of this Garden Flair Kids’ Bedroom’s occupant is a Montessori teacher who believes everything around the child will affect the development of her daughter’s personality. That philosophy isn’t just a buzzword. It’s the blueprint.
In a Montessori home, clutter is the enemy. Every object needs a purpose. Every shelf invites interaction. The result is a room that feels calm but isn’t empty. It’s curated.
The Low Shelf Strategy
Look at the storage. It’s low. Always low.
Montessori principles dictate that children should access their toys independently. If it’s up high, they can’t reach it. If they can’t reach it, they can’t choose it. And if they can’t choose it, they aren’t engaging with it.
This room uses open shelving units placed at the child’s eye level. No doors. No knobs. Just clear sightlines to books, puzzles, and soft toys. The idea? Reduce decision fatigue. When everything is visible, a child can pick one thing, play with it, and put it back. The cycle completes. The room resets.
Material Matters
Notice the textures. Wood. Cotton. Wool.
Plastic feels cheap and static. Natural materials age. They wear. They teach a child about care and maintenance. The flooring is likely cork or hardwood. Both are durable. Both are warm underfoot.
The bedding? Organic cotton. Breathable. Safe. No synthetic dyes off-gassing in a space where a child spends half their life sleeping. It’s not just about aesthetics. It’s about air quality. Skin contact. Long-term health.
Color as Calm
The palette is soft. Sage greens. Muted yellows. Whites.
Bright primary colors stimulate. They grab attention. They create overstimulation in small spaces. Soft, earthy tones soothe. They lower cortisol levels. They make the room a sanctuary.
Garden Flair leans into this with botanical prints. Not cartoonish. Realistic. Detailed. These images spark curiosity. They invite observation. A child can trace the veins of a leaf. Count the petals. It’s learning disguised as play.
Safety in Simplicity
There are no sharp corners. The furniture is rounded. Anchored to the wall.
Choking hazards? Gone. Small beads? Removed. The space is stripped down to the essentials. A bed. A shelf. A small chair. A rug.
Less stuff means less cleaning. Less cleaning means more time for actual interaction. The parent isn’t chasing toys. They’re building with them.
Why It Works
This approach isn’t about minimalism for the sake of Instagram. It’s about developmental psychology.
Children need structure. They need predictability. When their environment is organized, their minds settle. They can focus. They can create.
The mother in this case isn’t just decorating. She’s engineering a space that supports autonomy. Independence. Growth.
It’s subtle. You won’t see the effort in the paint color. You’ll see it in the child who can get dressed alone. Who can tidy up without being asked. Who feels safe in their own skin.
That’s the real renovation.
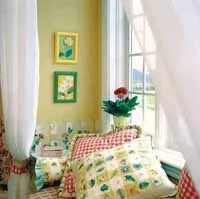
The shift to a nautical theme isn’t about plastering the walls with anchors. It’s deeper than that. This room pulls from the romance of sailing without feeling like a themed hotel lobby. Think crisp whites, navy blues, and touches of weathered wood.
Why a nautical theme works for growing kids
Parents often worry that a strong theme will feel outdated by middle school. A well-executed seafaring design avoids this trap by focusing on texture and classic color pairing.
- Color strategy : Stick to a base of white or light gray walls. Use navy or midnight blue for bedding and accent pillows.
- Material choices : Canvas, linen, and wool feel authentic. Avoid shiny polyester or cartoonish prints.
- Decor accents : Rope details, brass fixtures, and framed vintage maps add character without being literal.
Practical storage for a shared space
Unlike the previous room, this design prioritizes open floor space for larger toys or sports equipment.
- Under-bed storage : Use rolling bins for off-season clothing.
- Wall shelves : Install floating shelves for books and trophies. Keep the floor clear.
- Seating : A sturdy bench at the foot of the bed offers extra sitting space and hidden storage.
Safety first
Even in a “cool” themed room, safety remains non-negotiable.
- Anchor all heavy furniture to the wall.
- Use rounded corners on desks and dressers if the child is young.
- Choose low-VOC paints to keep air quality high.
How to transition as they age
The beauty of this style is its flexibility. Swap out the bedding for a solid color as they get older. Replace the rope light with a modern pendant lamp. The core structure stays relevant; only the accessories change.
This approach saves money in the long run. You aren’t ripping out drywall or replacing floors every few years. You’re just refreshing the soft goods.
“A good theme grows with the child. It should feel like a backdrop for their life, not a cage for their personality.”
For more inspiration on balancing style and function, explore these categories:
- Kids’ Rooms
- Baby Nursery Decorating Ideas
- Toddlers’ Bedroom Decorating Ideas
- Teen Bedroom Decorating Ideas
- Playroom Decorating Ideas
- Kids’ Bathroom Decorating Ideas
- Safety Tips for Decorating Kids’ Rooms
- Kids’ Rooms Decor
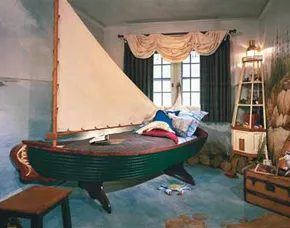

Transforming awkward nooks into immersive seascapes
A small room with awkward eaves might seem like a lost cause for ambitious decor. It is not. A masterful trompe l’oeil painting can turn that cramped space into a natural setting. It blurs the boundaries. The ceiling becomes sky. The walls become cliffs. The floor becomes sand.
The result is a permanent island getaway. It works especially well for a youngster who loves water. Rustic environs come alive here. Craggy rocks jut out. Beach grass sways. Fir trees stand guard. You can even paint rustic little boats resting on the shore. A sea meets a cloudy sky in the corner. It weaves a spell.
Power in decorating comes from having one big idea. You work variations on that core concept. With a sea theme, you have flexibility. You could drift from this rustic fishing village look. Maybe your child prefers a treasure island vibe. Or perhaps a tropical getaway suits them better.
This approach helps you find the right theme. There are many big ideas for kids’ bedrooms. You just need to pick the one that fits your child’s personality.
More decorating resources
If you need more inspiration, check out these specific guides. They cover various stages of childhood.
- Kids’ Rooms
- Baby Nursery Decorating Ideas
- Toddlers’ Bedroom Decorating Ideas
- Teen Bedroom Decorating Ideas
- Playroom Decorating Ideas
- Kids’ Bathroom Decorating Ideas
- Safety Tips for Decorating Kids’ Rooms
- Kids’ Rooms Decor
About the authors
Mary Wynn Ryan has written numerous interior design books. Her works include The Ultimate Kitchen and The Ultimate Bath. She also authored Cottage Style, Fresh Country Style, and Garden Style. She has contributed to various magazines. She served as the Midwest editor for Design Times magazine.
Heidi Tyline King is an accomplished writer and editor. She writes about America’s arts and culture. Her work covers nature-based attractions and decorating projects. She wrote All About Paint and Wallpaper. Other titles include Beautiful Wedding Crafts and the Pelican Guide to the Florida Panhandle. She also co-authored The Unofficial Guide to the Southeast with Kids.