




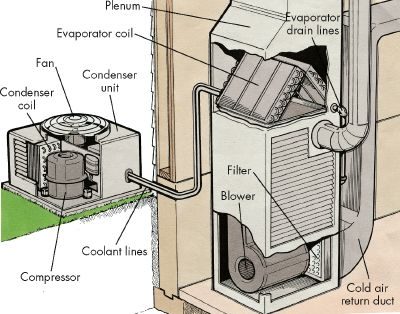
Central air systems are two-part beasts. You have the condenser, the outdoor unit sitting on that concrete slab, and the evaporator coil. The coil hides inside your home, tucked into the plenum or main duct junction right above the furnace. They work together, but they live separate lives.
Most homes connect these components to a forced-air distribution system. That means your heating and cooling share the same heavy lifting infrastructure. The blower motor. The ductwork. The furnace itself. When you flip the switch for AC, the system doesn’t create cold air out of thin air. It moves existing air.
Here is how the cycle actually works in a typical home. Hot indoor air gets sucked back through the return-air ducts. It heads straight for the furnace area. The blower forces that warm air across the chilled evaporator coil. The air drops in temperature. Then the system pushes that now-cool air back out through the supply ducts to your rooms.
If the air conditioner is running but your house stays warm, the issue is likely not the cooling mechanism itself. Look at the distribution system.
When you feel a lack of cooling, don’t immediately blame the compressor or the refrigerant lines. The problem often lies in the ducts or the blower. Maybe a duct is disconnected. Maybe a damper is closed. Maybe the filter is clogged so tight the blower can’t move air across the coil.
The cooling happens at the coil. The delivery happens everywhere else. If the delivery fails, you get zero temperature drop. Check the ducts first. Then check the blower. Then check the coil.
The Hidden Complexity of Central A/C Systems
You think your central air conditioner is just one machine. It’s not. It’s a split system. You have the condenser unit sitting on a concrete slab outside, sweating away heat. Inside, you have the evaporator coil, tucked up above your furnace in the plenum. Both are sealed units. This isn’t a leaky bucket you can patch with duct tape and hope for the best.
Because these components are sealed, you’re mostly out of luck if things go wrong internally. Call a pro for almost any real maintenance. They should inspect and adjust your system before every cooling season starts. But don’t stop there. Annual checkups are baseline. To keep efficiency peaky, you need to do the work you can do.
Caution: Before touching anything, kill the power. Both to the condenser and the evaporator assembly. Do not skip this.
If your system is acting up, look for the symptom. There’s a troubleshooting chart coming up, but let’s be real: most “repairs” you’ll make are actually cleanings or adjustments.
Troubleshooting Your Central Air Conditioner
You don’t need a degree in thermodynamics to fix minor hiccups. If your central a/c isn’t working right, check this list before you burn cash on a service call.
Condenser doesn’t run
* No power: Check fuses or circuit breakers at the main panel. Restore the circuit.
* Thermostat set too high: Lower the setting by 5 degrees.
* Faulty motor or compressor: Call a professional. Do not guess here.
Uneven cooling
* Distribution system out of balance: Balance the system. This usually means adjusting dampers in your ductwork.
Inadequate cooling
* Thermostat set too high: Drop it 5 degrees.
* Evaporator dirty: Clean the evaporator.
* Unit too small: You’re stuck. Replace with a larger unit and hire a pro.
Unit doesn’t cool
* Thermostat set too high: Lower it 5 degrees.
* Condenser dirty: Clean the coil and fins. Straighten bent fins if needed.
* Blocked condenser unit: Remove debris. Cut down weeds, grass, and vines choking the intake.
* Evaporator dirty: Clean it.
* Compressor faulty: Call a pro.
* Low refrigerant: Call a pro. You cannot fix this yourself.
Condenser unit turns on and off repeatedly (short cycling)
* Condenser dirty: Clean the coil and fins.
* Blocked condenser: Remove debris. Trim vegetation.
* Evaporator dirty: Clean the evaporator.
A dirty evaporator is the most common culprit here. If you don’t clean it, your system chokes. Let’s talk about how to access and clean it properly.
Cleaning the Evaporator Coil
The evaporator lives in the plenum, right above the furnace. It might be hidden. If there’s foil-wrapped insulation at the front of the plenum, you can get to it. If it’s a sealed sheet metal box with no access panel? Stop. Don’t try to open it.
If you can reach it, clean it once a year. Here is the step-by-step process.
Step 1: Access the coil
Peel back the foil-wrapped insulation. It’s likely taped. Remove the tape carefully. You will need it later. Behind the insulation is an access plate held by screws. Remove those screws. Lift off the plate.
Step 2: Scrub the coil
Use a stiff brush to clean the entire underside of the evaporator unit. A large hand mirror helps you see the back corners where dust hides. If you can’t reach the rear, slide the evaporator out slightly. You can slide it even if rigid pipes are connected, but be gentle. Do not bend those pipes.
Step 3: Flush the drain pan
Clean the tray below the unit. This tray carries condensation away. Pour one tablespoon of household bleach into the weep hole to kill fungus. In humid weather, check the pan every other day. If it’s full of water, the weep hole is clogged. Poke it open with a piece of wire.
Step 4: Reassemble
Slide the unit back into place. Reinstall the plate. Tape the insulation back over it.
Step 5: Test and seal
Turn the air conditioner back on. Check for air leaks around the panel. Seal any gaps with duct tape.
You might still have issues. If the outside unit is the problem, you’ll need to clean the condenser next.
Clearing the Outdoor Condenser Unit
The condenser sits outside your home. It takes a beating. Leaves, grass clippings, and dust stack up on the coils. A fan pushes air through these coils to release heat. If the air can’t flow, the system chokes.
Before you touch anything, find out which way the air moves. Check the intake side. You need to clean there first. Then shut off the power.
Step 1: Clear the perimeter
Cut the grass. Pull weeds. Remove vines. If vegetation is touching the unit, airflow is restricted. Give it space.
Step 2: Wash the coil
Grab a commercial coil cleaner. You can find it at refrigerator supply stores. Follow the label instructions exactly. Spray it on. Let it sit. Then flush the coil.
Do not use a garden hose for this part. Water pressure can push dirt deeper into the fins. It creates mud. Let the coil air dry.
Step 3: Fix the fins
Use a soft brush to remove accumulated dirt. You might need to take off the protective grille to reach them.
Be careful. The fins are made of light-gauge aluminum. They bend easily. If they are bent, you will need a fin comb. You can buy these at most appliance parts stores. The comb slides into the spaces between fins. Slide it gently. If you force it, you’ll tear the metal.
Step 4: Level the pad
Check the concrete slab underneath. Set a carpenter’s level on the unit. Check front to back. Check side to side. If the pad has settled, the unit is crooked.
Lift the corner with a pry bar or a piece of 2×4. Wedge gravel or rocks underneath until it’s level. A tilted unit drains poorly and wears out faster.
Protecting the Unit in Winter
Fall and winter bring leaves. They clog the fan. Ice can damage the coils. Cover the condenser unit when the season ends.
Use a commercial cover that fits the shape. Or use heavy plastic sheeting. Secure it with sturdy cord. This keeps debris out. It prevents ice damage.
When to Call a Pro
If you’ve cleaned everything and the air is still warm, the problem is likely refrigerant. Most systems use Freon. If the amount is wrong, you get no cooling.
Do not try to charge the lines yourself. It is dangerous. Call a professional service person to recharge the system.
However, you can fix the lines. Examine the coolant lines running from the condenser outside to the evaporator inside. Look at the insulation. If it is damaged or worn, efficiency drops. Replace it.
Buy new insulation of the same type. Follow the manufacturer’s instructions. Do it soon. Bad insulation wastes energy.
You now know the limits. You can handle the cleaning. You can fix minor insulation issues. But leave the refrigerant to the pros. This approach saves money. It gets your cool air back faster.
Check out how to repair room air conditioners if you have a window unit. The principles differ. Major appliance repair guides are also useful. If you suspect the a/c is fine but the house is still hot, check the thermostat. Calibrating it might be all you need.